Thank you for visiting Little Schoolhouse in the Suburbs. Please subscribe and you'll get great learning tips and how-to activity articles delivered to your inbox, for free!

Showing posts with label Sensory Shelf. Show all posts

Monday, February 13, 2012

Color: DIY Color Box


I've been trying not to buy Color Box 3 for ages.  I think the layout is SO PRETTY.  But since I couldn't justify it, I made a DIY version with paint samples from Walmart.  I'm not into taking big piles of free stuff from stores, but this time I made an exception, as I will likely laminate and maintain this collection, using it to choose paint over the next hundred years. 

I found that the biggest time investment is FINDING the shades in order.  It was a workout for my eyes!  I don't like the one that I can't cut off the name of the shade without making my card tiny, so I had to hand pick the colors individually.  (I think these are Better Homes and Gardens)  Then I went home and lopped off the name.

I *think* I have EIGHT of each color blue, red, yellow, green, orange, purple.  I have the browns and black but they don't have a place on my color wheel, so we put them to the side.


Since my kids are older, we mix all the cards.  They sort by color and then shade.

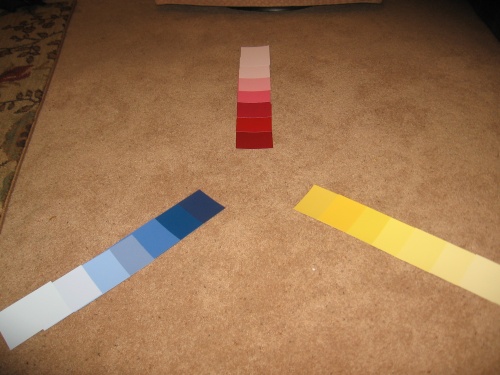
First we lay out the primary colors.


Then we add the secondary colors.


Full disclosure, my kids don't LOVE this activity like I do.  But after performing it a few times, I found them lining up all their markers, pencils, and crayons by color and shade and sorting them into containers.


Sunday, February 5, 2012

Steriognostic/Math: Cuisenaire Chutes and Ladders


I LOVE this game. The kids quickly learn the cuisenaire values, get great sensory discernment, memorize their math facts, and learn to measure in centimeters with their hands!

It's just chutes and ladders.  The print out you see is from this free book.  You could also use a regular Chutes and Ladders board.

Instead of using a spinner, you draw rods out of the bag.  Yes, that IS a bag for crackers.  My pretty canvas bag hadn't come in the mail yet.

You may have to set a time limit on how long someone gets to root around in the bag looking for a "5" so they can go up the ladder, but I think it's worth it.

In order to master the game, there were several spontaneous "time outs" called by the short folks to line up all the rods by size and practice measuring with eyes closed.  They were worried that I wouldn't like that.  As Margaret Homfrey from Montessori World says, "You see the children doing intelligent things....and the teacher is very pleased."


Tuesday, January 24, 2012

Grading: Mini-Knobbed Cylinders


I would love to buy the giant knobless cylinders, but I can't justify the price yet.  Especially when my heart is set on a $128 mass kit.  And an $80 tessellation kit.

Anyway, these were $25 and get the point across. They are challenging enough to hold my nine-year-olds attention if you get them out all at once.  The four sets are as follows:


These are popular every time I get them out.  They aren't as sexy as the big ones, but we have a storage issue and the mini set doesn't take up much space.  


Thursday, December 29, 2011

Grading: Bolts


This is one of our favorite activities.  I saw it first in Montessori at Home.  He has a specific set of measurements for grading the bolts, washers, and nuts, but my home improvement store didn't carry those sizes, so I just got the biggest bolt I could find and worked my way down in increments.  The associate on that row must have thought I was crazy.

Anyway, I just used a dollar store tray and sheet of foam with at least six different sized bolts, nuts, and five matching washers.  I have  the kids grade them according to size and then put them together.  At first they tried to do it without grading, but as a larger washer will fit on any of the bolts that are smaller, they got  confused, so grading is necessary. 

Of course my boys HAVE to think outside the box...


 And let's don't forget the bunny ears....


Saturday, December 24, 2011

Grading: Sockets


Materials Needed:  A series of sockets decreasing in size (rob hubby's tool box), a Dollar Tree tray liner with paper or foam, small box to hold sockets all mixed.

How To:
1.  Invite child over to see what you have.
2.  Gently pull each socket out of the box and lay on the table all mixed up.
3.  Find the biggest socket and set it on the left side of the paper.
4.  Find the next sized socket and set it beside the largest.
5.  Continue until all of the sockets are in a line.
6.  Place sockets back in the box, mixed for the next time.

I *think* I saw this activity in Montessori At Home.  Some activities I already had and THEN saw them in John's e-book, but I think I got this one from him.

Variations:  Go smallest to largest.  Make a curve.  Stack a tower.  Lace them on a shoelace.

Monday, December 19, 2011

Go-Togethers: DIY Baric Jars


Materials Needed:  10 clean big baby food jars, spray primer, cheap white, blue, and red acrylic paint, cotton balls, stickers, about $3 in pennies.

1.  Spray the lids and inside of the dry baby food jars with primer and allow to dry.
2.  Pour white acrylic paint in jars and turn to coat.  Drain and dry. (They don't have to be perfect just mostly opaque.)
3.  Paint lids, five red, five white.
4.  Line dry jars with cotton balls and place pennies inside in matching pairs of jars.  I did two of each.  I think I did:  empty, 10, 25, 35, 50.
5.  Cap pairs, one red and one blue.
6.  Put matching stickers on the bottoms.

To set up the center, I put them on Dollar Tree cookie sheets, lined with foam.

1.  Ask child to come see what you have.
2.  Line up the blue jars at the top of the tray.
3.  Pull one jar out and test all of the red ones against it.
4.  Put that pair aside.
5.  Continue with steps 3 & 4 until all jars are matched.
6.  Turn them over to check your work.
7.  Gently place them back on the tray, mixing them up so it will be fun for the next person.

Go-Togethers: $2 Touch Boards


Materials Needed:  somewhat matching floor sample tiles from Home Depot for your poor pitiful kitchen, Dollar Tree sandpaper pack, glue 

1.  Cut two pieces of each grade of sandpaper in the pack
2.  Place matching floor tiles together and glue matching grades of paper to them.
3.  Spread glue very evenly so they don't do this:   

  
4.  Allow to dry completely before taking picture for your website. (Duh)


To use the center:  Assemble in lined tray the matching tiles and a blindfold.  Note:  this center is easiest if you "sensitize" your fingers first.

1.  Ask the child to come over; you have something to show them.
2.  Turn the tiles to the backside and chose one of each pattern.
3.  Place them at the top of the tray in a straight line.
4.  Mix up remaining tiles and place them in a stack below.
5.  Cover or close your eyes.
6.  Pick up first tile at the top of the tray and feel it in a straight down motion, placing it in front of you.
7.  Feel squares from your stack in the same manner until you find one that feels the same.   
8.  Set the match aside and find the next tile at the top of the tray.
9.  Feel squares from the stack and find the match.
10.  Continue until all tiles are matched
11.  Remove blindfold and turn over squares to see if the floor samples match.
12.  Replace tiles on tray and mix up so that they will be fun for the next person.

Friday, December 16, 2011

Steriognostic: Blind Object Sorting


Materials Needed:  A Dollar Tree tray with liner, blindfold (clothespin if heads too big for the velcro to reach), Dollar Tree ramekins.  Two or three types of objects.  I used cubes from my base ten set, dollar store party favor balls, and my daughters marbles.

How To:

1.  Assemble as seen in the picture above.
2.  Tell child you have something to show them.
3.  Adjust ramekins in front of you and close your eyes.
4.  Sort objects by touch only into the three containers until they are all gone.
5.  Open eyes, pour objects back into large bowl, ready for the next child.

Friday, December 2, 2011

Go-Togethers: Easy Smelling Jars


For Big and Middle, this is an entertainment center while I work with the other kids. But it's "assigned" for Little. He has serious sensory defensiveness about smells. So, after a bit of exercise and a treat, we match the smelling jars together.

Here's how you make your own set.

1. Find a friend who makes soap and keeps essential oils. If you don't have access to a variety of essential oils, raid your own spice cabinet for extracts, your medicine cabinet for menthol rub, alcohol, or whatever else you have around with an interesting scent.

1. Buy a tray, some cotton balls, small stickers, and one or more packs of wedding bubbles from the Dollar Store. If you don't already have some construction paper or foam to line the tray, get that too. Anything you can do to make the set up more beautiful makes it more attractive to the child.

2. Dump out the bubble solution and pull off the wand under the cap.

3. Stuff each container with a cotton ball.

4. Mark the containers on the bottom into matching sets. I used stickers.

5. Mark the tops of one of each set. This allows the child to proceed through the exercise in an organized way. If he lines up the set with marked lids, he knows he has one of each scent in the line and the unmarked containers are the matches with no doubles. Again, I used nine identical stickers. Some other marking system may be more attractive, but what are ya gonna do?

6. Into each set, dropper some essential oil or extract.

If you did this correctly, you should now have matched sets, identifiable by the marking on the bottom so the child can check his work.

For the first round of smelling work, only put out three or four sets and make sure they really contrast. Be sure to show the child how to progress through the work in an orderly fashion; see this link HERE.


Tuesday, November 15, 2011

Grading: Knobless Cylinders

When my decade-experienced math teacher husband saw these, he just gushed over them. "Oooo, that's really going to help their spatial reasoning!" Grading by height and diameter is an important foundational skill for mathematics and two of my kids are really resistant to anything that smacks of math. Grading the size or thickness of triangles on paper wasn't going to happen. So finding something that looked attractive and fun in this department was a must.

That "spatial reasoning" hubby was talking about is what helps a kid see something like a top down drawing of a cube and understand what he's seeing and what will fit into it. Very important for math!


The knobless cylinders are four boxes of wooden cylinders that vary in diameter and height. The yellow cylinders increase in height with diameter. The green decrease in height as diameter increases. The red only change diameter and the blue only change in height. Below is one of the traditional ways to stack them.

Since this is a foundational skill for math, it's no surprise that my math-is-easy Big Kid took to these like a duck to water. However, it's Middle and Little that really need the work out. Since math is a hard language for them, I'll likely have to "assign" this work to them from time to time to develop their skill. Montessori schools encourage free choice, but I've found with my kids that they often avoid activities that are related to subjects they need work in. So, don't think you can just lay these out and the kids will go wild. That may be only true for your math-heads.

Like most Montessori Materials, these little guys don't look like much, but they have DEPTH to them. They aren't one-hit wonders. There's no way to be FINISHED with them, really, but this video will get you kid started.

These were initially designed for young children, but I've found that they work for all ages, especially if appropriately challenging activity cards are supplied. I found the ones at abcteach.com to be the most age appropriate for my kids. My kids are older and need a challenge. For younger children, these are just fine. I also found lots of pictures online and printed those out too.

I got my cylinders from IFIT. They were on sale for $38, which is crazy. IFIT delivered the materials extremely quickly. I have already noticed some chipping, but their prices fit my budget best. That, and if I really care too much about chipping, I'll truck them over to Depot and get a little paint jar color-matched to them.

There are certainly less expensive ways to work on a child's grading and spatial reasoning, to support growing math skills, but since I have a ten year age range (so far) with my kids, I prefer evergreen activities that will last for decades. That, and Little and Middle are both VERY tactile learners. Traditional grading by size on paper and whatnot doesn't work as well. Catering to tactile learners can make homeschooling EXPENSIVE, but when I have room in the budget, I'd rather spend the money on some quality natural materials that the kids are naturally drawn to, rather than plastic throwaway material.

Definite keeper! This center will be on our rotation for years to come.

Deanna