Thank you for visiting Little Schoolhouse in the Suburbs. Please subscribe and you'll get great learning tips and how-to activity articles delivered to your inbox, for free!

Showing posts with label Kindergarten. Show all posts

Thursday, March 1, 2012

Practical Review: Creative Alphabet For Preschool and Kindergarten


Marie Picard's  Creative Alphabet For Preschool and Kindergarten site description:
A great help for the parent to make a reading and writing readiness program for preschool and kindergarten. Includes a printing page at 1 1/2" size character for each letter of the alphabet, each with a word and a line drawing to color. Next to each printing page is a full list of words to choose from, for vocabulary, for an alphabet scrapbook, and for activities perhaps to do and talk about during the time your child is doing a particular letter. Other little siblings can benefit at the same time as they can see and hear and perhaps do at their level what the older child is drawing or colouring. The results should show that your student knows the sound and shape of each letter of the alphabet. After this book your child might practice in Book B. Check out our sample pages for both Book A and Book B.


My Thoughts:
This book is really intended to be a jumping off point for learning letter sounds.  According to the instructions in the front, it is only secondarily a handwriting book.  It has the parent teach the letters and sounds in alphabetical order.  For each letter, there is instructions on how to form it, several to trace, a couple of words to trace starting with that letter and then an extensive list of art projects, saints, scripture, songs, sports, food, toys and chores that all start with that letter sound.  It is intended that the parent spend several days on each letter and it's sound, using the list to generate activities or scrapbook ideas, and once the child has it mastered, the parent reviews the previous letters and sounds already learned.  I think this text would be especially helpful to a preschooler's mother who wishes to give him a head start without formal lessons with heavily scripted activities.  There are SO many letter sound categories and suggestions that a parent can choose whatever they have on hand that week to reinforce the sounds.  


My one criticism is the arrangement of letters learned.   A child would be most of the way through the year before he could read  Mat sat. Sam sat.  However, since this text doesn't build on itself, you can teach the letters in any arrangement you like.  If someone were using this text for preschool language instruction, I would suggest getting a set of Bob Books and teaching the letter sounds in the order they appear in that series.


MODG Families:
This text is used for MODG Kindergarten handwriting.  It not necessary to teach the letter sounds, as it is only intended for handwriting practice.  One page is taught per week, spending a little time each day forming the letters and tracing the words.  The syllabus follows the text by teaching the letters in alphabetical order.  


My Recommendations:
We found that it works best for us to teach the letters of the child's name first.  Then, the child learns the letters in a similar order as the phonics text.  


This is especially helpful if you were to be requiring actual WRITING for the "sound writing" activity at the tail end of the phonics lesson.  Early in the year, while we're learning to write our name, we often use sandpaper letters for that task in the phonics text (there's no M in Zach, so he wouldn't know that one yet), eliminating the pencil skill.  But once we're ready to move onto other letters, I chose the pages for handwriting that we'd be "sound writing" at the end of the week.  


For the phonics lesson, we are naming the lower case letter only by sound.  For handwriting I call it by name.  The child himself may notice that he knows the sound of that letter from his phonics text, but I don't point it out until the sound writing activity at the end of the week. That way the child can practice all week on the form and then connect it to the sound after the fine motor isn't such a chore.  


Conclusion:
If used as written, I feel this text would be very helpful for a Catholic preschooler's mother who wants to teach letter sounds, forms, and doesn't want to go out buying supplies for scripted activities.  One week she could use saints, another week using food examples.  It's unlikely that, given the extent of the list, she would need to shop at all to provide hands on examples.  Additionally, she won't have to think them up herself.  That alone makes it worth the $8.  Just look down the list and see what you have on hand.  However, I wouldn't recommend following the internal order of the book.  ABC order is not the best way to teach letter sounds as it is such a long time before the child gets to connect his skills to actual words.  M and S are too far down the alphabet!  


As a MODG handwriting book alone, it's sweet, but out of order for the phonics text which means the "sound writing" exercises at the end of the phonics lessons will need to NOT be actual writing.  Additionally, if a family is strapped for cash, as a handwriting text alone, it doesn't add anything that a parent couldn't provide with pencil and paper.  


However, if you are going to follow MODG's "one lesson a week" pace (generally 10 tasks per lesson) for the phonics text, and like me, concentrates that effort in twice a week sessions, the (really adorably Catholic) letter sound list would be sufficient for a parent to come up with a letter sound review activity on the fly for the off days from the phonics text.  I am BANANAS when it comes to manipulatives, but someone else might just want to review the letter sounds using cans from the pantry or the faces of saints in her stack of holy cards.  This text will have that list already ready for you. 

Wednesday, February 29, 2012

Practical Review: Teach Your Child to Read in 100 Easy Lessons


Book Description from Publisher:
Is your child halfway through first grade and still unable to read? Is your preschooler bored with coloring and ready for reading? Do you want to help your child read, but are afraid you'll do something wrong?


SRAs DISTAR® is the most successful beginning reading program available to schools across the country. Research has proven that children taught by the DISTAR® method outperform their peers who receive instruction from other programs. Now for the first time, this program has been adapted for parent and child to use at home. Teach Your Child to Read in 100 Easy Lessons is a complete, step-by-step program that shows patents simply and clearly how to teach their children to read.

Twenty minutes a day is all you need, and within 100 teaching days your child will be reading on a solid second-grade reading level. It's a sensible, easy-to-follow, and enjoyable way to help your child gain the essential skills of reading. Everything you need is here -- no paste, no scissors, no flash cards, no complicated directions -- just you and your child learning together. One hundred lessons, fully illustrated and color-coded for clarity, give your child the basic and more advanced skills needed to become a good reader.

Teach Your Child to Read in 100 Easy Lessons will bring you and your child closer together, while giving your child the reading skills needed now, for a better chance at tomorrow.

My Thoughts:
This book is a one-stop shop for learning to read.  There's writing, sounds, rhyming, blending, comprehension.  There's no need for any supplemental material, if you use it as written.

I find that this book works great on the "20 minutes a day" schedule it advertises for Lessons 1-20.  This will cover ALL the reading, writing, grammar and language work a parent could want.  

However, for lessons 20-100, I will repeat what another homeschool mom said about it:  The lessons aren't 20 minutes, they aren't "easy", and there's way more than 100 of them.  

The text doesn't change at that point, rather, the child starts really having to work.  Sentences are longer by that point, there's enough sounds to review that this takes some effort, and generally, my kids start to HATE it.  

That being said...I highly recommend it.   This program is effective, efficient, and cuts out all of the fat.  I would have a terrible time strong arming my kid into doing busywork, but there is NO busywork in this program.  It gets the job done!  Just be forewarned that if your child doesn't like to work hard (like most kids), you will need a backbone after Lesson 20 to make this happen.

MODG FAMILIES: 
MODG's Kindergarten and First Grade lesson plans have you do about one Lesson per week (not per day as the book advertises).  


I have found that we breeze ahead in the syllabus for Lessons 1-20, but slow down to that "one Lesson a week" rate from then on.  Rather than doing 1-2 tasks a day, as it recommends in the syllabus (there are 9-10 tasks per Lesson), we find that we can do half a lesson in a sitting, twice a week.  (There's a tantrum when the book comes out, and I can only work myself up to that a couple of times a week, so I get out of them what I can in each sitting before they go boneless and refuse to work.)  

Now, because of this slower pace (whether that happens at Lesson 1 or Lesson 20 for your family), they aren't getting the level of writing practice (and possibly sound review) that they need to keep from backsliding.  Once a week writing isn't enough. So, MODG uses a separate writing curriculum Writing Can Help Series, Book A: A Creative Alphabet (Marie Picard).


My Recommendations:
The MODG syllabus has you follow the internal order of the writing curriculum.  If you are going to follow that plan, I would not require the child to actually WRITE on the "sound writing" task in the text.  If he hasn't practiced making those letters yet, this will be REALLY frustrating.  So, on those weeks that we didn't practice those letters in writing, I let them finger-trace sandpaper letters instead.


Another alternative is to not follow the internal order of the writing book and instead practice all week on the pages in that book containing the letters from the "sound writing" task in Teach Your Child to Read in 100 Easy Lessons.  For example, if you're working on Lesson 29 this week, practice ALL WEEK writing on the N and U pages in the writing workbook, since that's what they'll be asked to "sound write" at the end of the week. I don't make them say the sound as they write until we reach that task in the reading text, unless they quickly master making the letters. 

You may be a tougher mom than me and get those kids to do that recommended couple of tasks a day, but if you're like me and only force them to do the text twice a week, half a Lesson at a time, then they aren't seeing the sounds DAILY.  I, therefore, supplement with made up sound review activities. On our off days, we read Bob Books, or play "build a nonsense word" game with the known sounds from our Alphabet rocks, or practice sorting objects by letter sound under the correct sandpaper letter.  This is totally unnecessary if you follow the lesson plans, as they will see the sounds daily.  

Conclusion:
This is a great language text.  It's a one-stop shop for all your reading, writing needs.  However if you, like me, find that after Lesson 20 you are going much slower than the text recommends, you will need to make up the writing and possibly sound practice to get enough repetition each week.

Saturday, February 4, 2012

Art Lessons: Inset Designs


Our Didax plastic insets from amazon are a favorite activity.  All you need is the insets, colored pencils, paper cut to size, and a hard surface.  

There are ten shapes in the series (see below.)

We use the series of lessons found at Montessori world. You can see our progression above.  
1.  One pink inset traced, colored with straight lines, picking up the pencil each time. 
2.  One shape rotated.  
3.  Trace the window, then trace the actual shape and see how close you can get.
4.  Use more than one shape.
5.  Make a symmetrical design and play with color.
6.  Move the stencil over the page evenly to fill the whole sheet.

But, of course, I just show them these lessons each time I set it out.  BUT,  I don't interrupt whatever they decide to do with it.

Friday, January 13, 2012

Bible Story Props


In kindergarten, we work on sequencing.  

Here's my son's story of Noah:  

"Noah got out of a big boat, hit his head on a rock, and died."  

I don't remember that part, you?  

Anyway, he's very tactile so I thought it would help him to play with the characters as he listened to the story.  There are some really expensive sets out there, but here's mine:

Materials:  a few packs of peg people from Michaels, all the doubles and leftovers from making the object boxes, a leftover large makeup bag for storage (not shown), a dollar store tray, some construction paper, and a slab of whiteboard from Depot.  Ignore that last item, it's not necessary.  It was just handy.  

To use:  

1.  Pre-read your story enough to know if it's in the desert or water or whatever to choose appropriate construction paper floor setting.  
2.  Dump all your junk into a lined tray.  
3.  Assign and dress characters (Our King Saul today wore a tea cup for a crown and David had a sauce pan full of mini fruit and wooden baseballs for rocks.  Goliath wore a large rice bowl for a helmet and had a wooden bat and disk propped on him for a shield and sword. I LOVED it.)
4.  Read story.  
5.  Have children retell it using the characters.
6.  Wonder how dinosaurs and a polar bear snuck into the back of the Philistine army and if that may have turned the tide....

Thursday, January 12, 2012

Mama's Box of Magic Cards


Since I don't have a dedicated school room, I keep this magic box of cards to fuel my one-on-one time with the younger kids, and once in a while, the Bigs.

My very favorite is the science sequencing cards. In our school, sequencing is the BIG DEAL in kindergarten.  First this happened, then THIS happened, and FINALLY this happened.  I HEART using science for kindergarten sequencing.  No lame-o sequencing of teethbrushing.  I want to slip in some RICHNESS.  

I won't give you ever single specific link, but if you are willing to file through the freebies at each site, I can tell you where to get them: 

1.  FREE Cicada Life Cycle at Montessori Tidbits 

2.  FREE Butterfly Life-cycle from Montessori Mom

3. FREE Frog life-cycle from Montessori Mom

4.  FREE Moon cycle from Montessori Mom

5.  FREE Season cycle from Montessori for Everyone

6.  FREE Apple life-cycle from Montessori for Everyone

7. FREE  Pumpkin life-cycle from  Montessori for Everyone  followed by a baby dino life cycle from ???.

I also like sorting and go-together cards the are science-based.

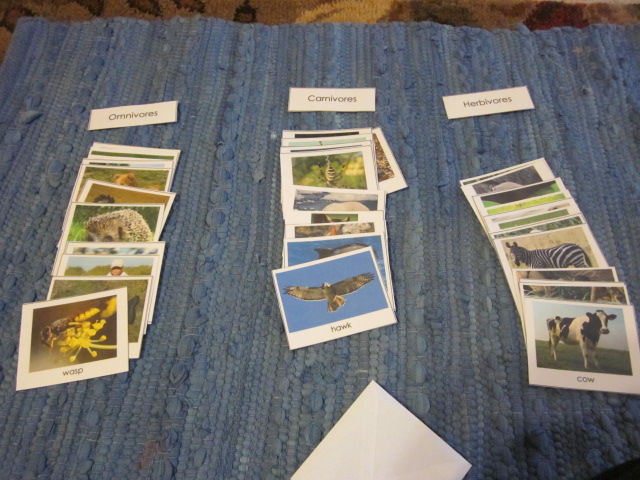
1.  (not free) Carnivore, Omnivore, Herbivore cards from Montessori for Everyone

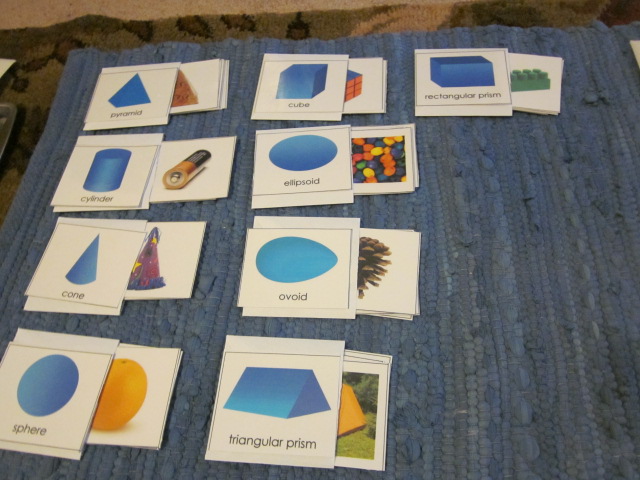
2.  (not free) Real life Geometric object sorting cards from Montessori for Everyone


3.  (not free) Patterns in Nature sorting cards from Montessori for Everyone


4.  FREE sorting and go-together cards from Montessori for Everyone and the left from a garage sale.


5.  FREE butterfly sorting and go-togethers from the classified cards at Beautiful Sun Montessori.  Not all of the butterflies have a pupa and larva to match, but ENOUGH do to make it worth your while.

My daughter LOVES them!

Saturday, December 17, 2011

Literacy: How to Build Object Boxes


I use object boxes A LOT.  I totally stole it from Montessori schools, so don't think I invented this at all.  However, building object boxes can be EXPENSIVE.  Lemme tell ya about how I did it on the cheap and then I'll tell you about what's in the boxes.

Finding cheap objects:

1.  Michaels Craft Stores:  The majority of my objects came from there.  You want four different things:

  • the mini flat wood doodads for gluing on something else wood, usually a display of a hundred tiny drawers.(bus, sun, pig shown above)
  • Crazerasers at $1 each 4-pack assortment (bag, bin, pin, and hat shown above)
  • The kids necklace section (dog, cat, shown above)
  • The 3-d wooden doodad section (egg, pot, bat shown above)
2.  Dollar store:  Only the rat above came from there, but I also got squirty sea creatures for the ray and whale and others, and the bug pack, and some snake and rats.

3.  Hobby Lobby:  Dollhouse miniatures that work out to less than $.50 per usable object. (see mop and lid above)  The tool pack, mops and brooms, pots and pans, food pack, dishes and silverware and a couple of others were the only ones on budget.  

4.  Junk drawers:  screws, bit (shown above), clips, etc were found in piles of nonsense around my home.

TYPES of object boxes:

Materials needed:  objects, lots of plastic bags, sharpie, set of dollar store foam letter puzzles in lower case.

1. Sort objects by beginning sound.  

2.  Separate out those that are multi phonogram, harder to spell words and use them for your initial sound sorting.  Ex:  "Whale" has two things going on.  WH and the silent E.  This makes it really too advanced for teaching the wh or the silent e or using for spelling purposes.  But since initial sound boxes are NEVER spelled, a little kid can sort that into a W column for the beginning sound, so my whale went in the W bag.

3.  Toss in a foam letter for sorting purposes.

4.  Next sort out all objects that are three and four letter phonetic words (pig, cat, dog) and put those into a bag for elementary word building once all the letter sounds are learned.

5.  Next sort out all objects that have a single multi-letter phonogram or demonstrate a single spelling rule according to your phonics scheme.  Since this gets pretty complicated trying to find single phonogram words, I will sometimes use objects that have two phonograms but one was already learned a while back.  Ex:  "juice" demonstrates the ui phonogram AND the c,g,job 3 silent e rule.  Since I taught the silent e rule after the "ui" sound, it went in the silent e bag.  Below you can see that I had already taught oy, oi, and er before this lesson, so I didn't mind having those phonograms in my c,g, job 3 bag.


6.  Finally, fill in your bags with leftover doubles and random crap from around your house.  I try to get at least three object per Kindergarten initial letter sound and at least one per multi-letter phonogram (hopefully more).

7.  Put all the odd objects that aren't going to fit your scheme into church busy bags or something.  Crazerasers are a big hit around here.

Literacy: Phonogram Rocks


Materials Needed:  Dollar Tree river rocks, Dollar Tree knick-knack trays and/or empty Dollar Tree Zen Gardens, two paint pens(red for consonants, blue for vowels), matte clear coat spray

How to Make

1. Sort rocks according to size and how many you can fit in your storage system.  You want at least three rocks for vowels and two for each consonant.  I only do one rock for multi-letter phonograms.

2.  Draw on rocks and allow to dry completely.

3.  Spray with hubby's acrylic coat spray stuff.


I use these for teaching introducing new phonograms.  I don't use them for mass word building.  There just aren't enough rocks.  I use a printed alphabet for that.


In addition to the phonograms themselves, I also made a few rocks for symbols.  Our program has you underline long vowels and put numbers below your silent "e".  See an example below.


But the thing that I use them MOST for is our daily phonogram dictation.  Below, she is quizzing herself on the sounds, and only those she knows are invited to the "party" at the top of the mat.  The first picture in this post is another way we quiz.  I say, "Put all the "er" sounds in the box."  Or I say, "Put ch, k, sh away."


I could just have her write or do phonograms orally, but I find that the rocks provide a fuller sensory experience and make everything stick better.


Thursday, December 15, 2011

Writing Skills: Dollar Store Zen Garden

Little Kid is resistant to writing. He struggles with fine motor. He has problems with pressure and force and so many different aspects of writing that I wanted to reduce the variables and just work on letter formation.

We use Handwriting without Tears which is developed by an Occupational Therapist and follows hand development. Additionally, by learning our capitals to write, it doesn't cross over with our lower case reading and allows him to focus on hand control alone. Letters start on the "smiley face side" or the "not smiley face side."

And with HWT, children learn to write with the frame of a small chalkboard which puts boundaries on the letter and give them a straight edge to push against. I liked that and wanted to have a "frame" on our sand writing as well. (Not to mention keeping the sand corralled.)


Materials Needed: Dollar Tree Zen Garden, a smiley face sticker, chopstick or other stick, paper cut to size, fat writing utensil (crayon or marker), Dollar Tree cookie tray, foam or construction paper for a liner.

How to:

(Stage 1) Place a SMALL amount of sand in the garden. It should barely cover the bottom. You want to see the letters come through well. Allow child to use his finger or perhaps one of the rocks to write.

(Stage 2) Encourage child to use chopstick or the back end of the rake that came with the set to write in the sand.

(Stage 3) Put paper cut to size in the garden. (Oooh, laminated paper and a wipe off marker would be brilliant...must try today.) Make sure it's tight so the writing implement doesn't make it scoot or dig under, hence the need for something FAT to write with.


Tuesday, December 13, 2011

Literacy: Sound Writing without the Writing


In our K phonics text, Teach Your Child to Read in 100 Easy Lessons, there's a "sound writing" task at the end of the lesson.  Little Kid finds fine motor hard, so I try to separate pencil skills from reading skills.  Too hard to do together.  Montessori schools use these sandpaper letters to introduce letter sounds.  A child traces the letter with two fingers and says the sound.  We use that same routine for whatever sounds Little Kid is supposed to be "writing" that day in his book.


Notice that these are right handed letters, meaning the they are meant to be held with the left hand and traced with the right, hence the space on the right hand side.


Sorting, Literacy: Object Boxes


This is an example of my initial sound object sorting boxes.  We use Teach Your Child to Read in 100 Easy Lessons.  The first time the letter E is presented is with the long E sound, which is why you see an easel, earring, and an evil monster.  I usually use Dollar Tree foam letters for the sorting columns, but I'd lost my letter E and had to use my Montessori sandpaper letters.  Also, you can see I hadn't quite acquired all the objects I needed so I improvised with things from the pantry:  apricot and italian seasoning.  Pitiful.

Below is another version that I printed out from Home School Creations.

I have these "boxes" grouped in  baggies by three letters at a time in the order presented in the book.  Each week, I retire a few letters and introduce the new ones.  In a Montessori classroom, all of the letters would stay out.  I don't have room for that, so we just have out the letters we're working on in Little Kid's school crate each week and he does them with me.

Memorization: Calling Yourself


This is my kindergartener memorizing his phone number.

Materials Needed:  Cell phone, other phone (one phone must be the home number.)

Set-up:
1.  Hold non-home number phone.
2.  Place other phone at your side.
3.  Show him how to turn on phone and demonstrate calling his home phone number, announcing the numbers out loud.
4.  Wait for inevitable ring and answer.
5.  Allow child to talk between phones in both ears.
6.  Turn off phones, hand him non-home number phone and allow him to try.
7.  Tell him to repeat as often as he likes as long as he has asked permission.

The siblings loved this activity.  He would hold the non-home phone and call them in the closet, upstairs, outside...he learned his phone number in a day!

Friday, November 18, 2011

Kindergarten Curriculum


We use Mother of Divine Grace for our curriculum.  I am enrolled in their school, but that enrollment allows me some flexibility in curriculum choices if I keep to the school standards.  I definitely organize the school day in my mind differently than they, but the essence is the same.

Here's the original:
Religion:
The Golden Children’s Bible (Golden Press)

Math:
Golden Step Ahead Workbooks: I Know Numbers (ed. Kathleen A. Cole)
Golden Step Ahead Workbooks: Numbers 1-10 (Lois Bottoni)
Golden Step Ahead Number Flashcards

Reading/Phonics:
Teach Your Child to Read in 100 Easy Lessons (Siegfried Engelmann)

Handwriting:
Writing Can Help Series, Book A: A Creative Alphabet (Marie Picard)
blank composition book

Poetry:
The Harp and Laurel Wreath (ed. Laura M. Berquist)

Art/Music:
Child-Size Masterpieces: Mommy, It’s a Renoir! - Text (Aline D. Wolf)
Child-Size Masterpieces: Mommy, It’s a Renoir! - Easy Steps 1-3
36 Traditional Roman Catholic Hymns: A Book for Singing with Accompanying CD Recordings
St. Michael Wooden Rosary Holder
Olive Wood Rosary Kit
Rosary Case Lacing Project
Lourdes Marian Grotto Kit
Spiritual Bouquet Card Kit (www.illuminatedink.com)

Literature:
Free choice from classic children's literature, liturgical year recommendations, and selections from The Book of Virtues.


My Real Curriculum:  
Poetry:  
We follow the syllabus except I add address, phone number, birthday, and songs about ABC's, days of the week, states, books of the NT, and months of the year to his memorization.
Reading:  
We follow the syllabus, except we generally get way ahead for lessons 1-20 and then switch to twice a week sessions when it gets hard, but we still cover the recommended one Lesson a week.  The only adaptation is the "sound writing" task at the end of each lesson is often a Sandpaper Letters task instead of pencil work, as he usually hasn't learned to write those letters yet.  On the off days when he just can't bear to do this book, we make up nonsense words with the sounds he knows using Phonogram Rocks or we sort objects by first letter sound.  Also, he takes a turn reading Bob Books to us at night when the other kids are doing their easy-reader read aloud time.

Writing:
We follow the syllabus pace, but we do the letters out of order so that the child first learns the letters in his first name and then we follow the same general order of the phonics text.  Alternatively, we use these notebooking pages for more practice or for variety if he's getting tired of the book. For extra pencil practice, he does Walmart workbook mazes (voluntarily...loads of them) while the other kids work.

'Rithmetic
We followed the syllabus until the Golden Books got too writing intensive.  He found writing the numbers really difficult, so we quickly did the rest of the non-number-writing activities and then switched to other things.  I used a lot of the activities from Montessori at Home to teach 1-9, the teens, and the tens, but aside from playing the Exchange Game, he wants "big boy" math, which means worksheets.  Go figure.  I use hers, because the number writing builds up slowly.  But there's weirdly advanced stuff in there, so I skip some things, like the less-than-greater-than puzzles.  Also, I already have an Abeka 1 workbook.  We might play in there too.

Religion
The Golden Bible is TOO HARD for my kids.  I already had to fight him for phonics and writing, I didn't want to fight him for Bible too!  It wasn't just "challenging", it was impossible for him to understand.  I might as well read the New York Times business section to him.  We like Lovasik's Children's Picture Bible mixed with the very cartoony, Catholic Bible Stories for Children for review and easier retelling. We go much faster than the syllabus, since I like to get through one Testament or the other in a year.  All the kids listen to the saint of the day and he tells me something he remembers from the story.

Art and Music Friday
We follow the syllabus for Art, but not music.  We sing songs together and he hears the older kids Music Masters on Friday.  Well, that's not true completely.  I don't do all of the crafts.  We have other handcrafts, like weaving looms, stitch boards, and art insets on our busy shelf. 

30 Minutes of Reading
Our school recommends 30 minutes a day of read-aloud time.  I do all three kids together.  We split our time between Burgess and Holling C. Holling stories, The Book of Virtues, tall tales and fairy tales, picture books, and the occasional Eggleston history book.

Tuesday, November 15, 2011

1 to 10: Tactile Cards


I've found tactile number cards indispensable for teaching numbers.

The tactile number set above is from The Knowledge Tree and the set below is a traditional sandpaper set from Montessori Outlet.

It seems that the Knowledge Tree set are his favorite and have the added benefits of going all the way up to 30 and directional visuals for tracing the numerals.

The set below is the traditional Montessori sandpaper numbers, but as you can see, if you want to go ahead and teach the number 10, you have to put the 0 and the 1 card together. I'm undecided on how much I like the traditional sandpaper numbers...I think if had I only intended to teach 1-9, then 10-19, I would like them better. But as it is, they kind of tripped me up by not having a "10" card.
They certainly are "prettier" and while that's really important in some activities with my kids, that attractiveness of these numbers didn't make this any easier.

Additionally, the Knowledge Tree cards can also be used with food counters...as long as your food item is non-greasy and small.